Table Of Contents
- Framing Artworks in Room Mockups, Personal Spaces, and Art Show Planner
- Framing Artworks in Virtual Exhibitions
- Showcasing framed Artworks on a blank background
You can frame your Artworks directly within Room Mockup, Personal Space, Art Show Planner, or Virtual Exhibition. Framing your art adds context and realism, helping collectors visualize how your pieces will look in real spaces.
Framing Artworks in Room Mockups, Personal Spaces, and Art Show Planner
After placing your Artwork in a Room Mockup, Personal Space, or Art Show Planner, click Frames at the bottom of the page.
To make the Frames button appear, you first need to place your Artwork on the space. Once the Artwork is added, click on it or select it. After the artwork is selected, the Frames button will become enabled and available to use.
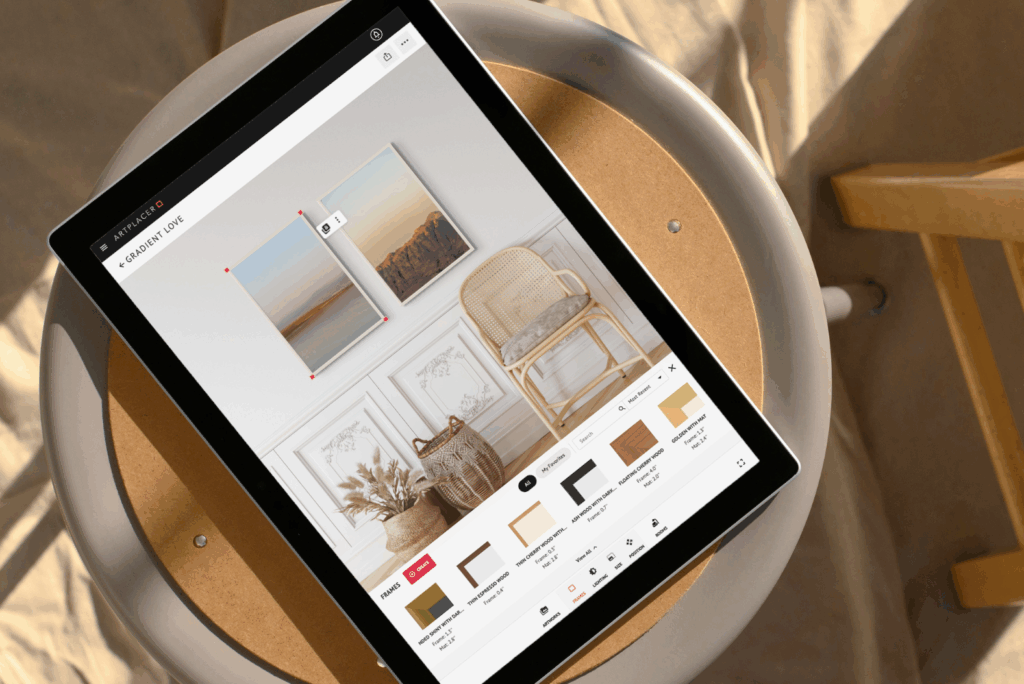
- Use the slider or search bar to browse available frames, and click on the one you want to apply it to your Artwork.
- If you wish to customize a frame, click the pencil icon on the frame’s thumbnail.
 This opens the Frame Builder. Once there, make your changes, and click Save. This will overwrite the original frame. Click Save as new to retain the original frame and also create your new one.
 - To create a completely new frame, click CREATE. This will open the Frame Builder; from here, design your frame as desired, and click SAVE.


This integrated tool gives you full control over the look and style of your Artworks, letting you tailor frames to match any setting or aesthetic.
Showcasing framed Artworks on a blank background
To display your Artwork with just a frame and without showing a visible room or setting, use the Room Mockup titled “Background”. This mockup provides a clean, blank backdrop that focuses attention solely on your framed piece.
To do so:
- Open Room Mockups. Navigate to the search bar on the top right corner and search for “Background”.
- Select the room titled “Background” from the results. This is a Smart space, so you can change the background color as desired. Keeping it white helps highlight the framed piece on its own, and it’s a perfect addition to product pages.

3. Choose the Artwork you want to display, and frame it, following the steps outlined in the first section of this article.
Framing Artworks in Virtual Exhibitions
- On the Artwork panel in your Virtual Exhibition, click the Artwork you’d like to frame.
- Click “Choose a Frame” and select the frame you want to apply.

- Scroll down and click “SET” to confirm your selection.
- (Optional) Check “Apply frame to all Artworks” if you want the same frame applied to every Artwork in the exhibition.

This feature ensures a consistent and professional presentation across your Virtual Exhibitions, enhancing the overall viewing experience for collectors and clients.
⚠️ Note: Kindly note that the frames displayed in Virtual Exhibitions are limited to the default ArtPlacer options. Custom frames created through the Frame Builder in Room Mockups, Personal Spaces, or Art Show Planner cannot be applied in Virtual Exhibitions due to technical restrictions.